
Dropper Posts: The What, Why, When and How
As anyone who has a dropper post knows; it is one of the BEST, if not THE BEST mountain bike innovation… EVER. After riding with one, but more importantly, after learning how and when to use it, it seems impossible to own a bike without one.
In the past, dropper posts had been criticized for their expense and lack of reliability. More recent designs, however, have largely solved these issues. If you’ve never tried one, you need to. It will, without a doubt, transform the way you ride your bike. Will it make you faster? Maybe. Will it make the ride more fun? Definitely.
What is a Dropper Post, Really?
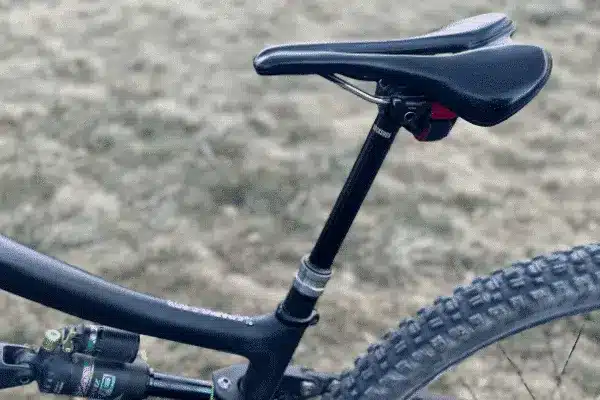
Simply put, it’s an adjustable seat post that will become shorter or longer depending on what the rider desires.
“Back in the day” when we all had to ride fully ridged, 3×7 drivetrain, 26” tire, fashionably narrow bar, concussion machines… one might pedal to the top of a hill, then manually lower the seat post for a descent. If you were so inclined, you may have adjusted your seat into a “compromise height” which would allow pedaling efficiency, and also still be maneuverable when desired.
Great news: You don’t have to do that anymore! The invention of the dropper post allows the rider to adjust seat height that on the fly, going up (yes up) or down, without missing so much as a pedal stroke. No more taking out a tool to adjust your seat, no more up and overs (putting your butt and weight way far back) to get behind your seat for descents, no more static seat riding. Period.
Why Use a Dropper?

The ability to lower the saddle (seat) on your mountain bike will give you much more maneuverability in just about every plane of movement. Most people typically use their dropper anytime more maneuverability is desired, and pedaling efficiency is not that important.
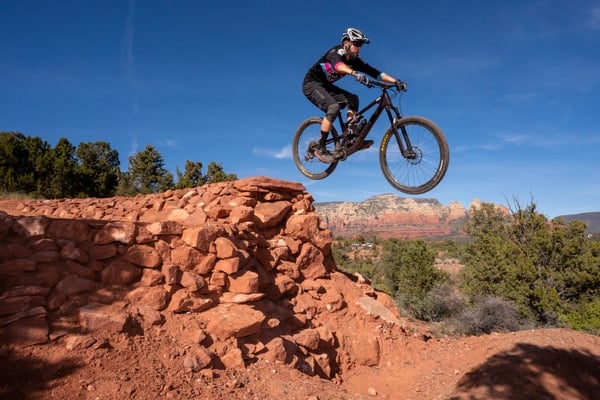
Chunky rock gardens, techie descents, slopestyle courses, berms and flat turns are just a few spots where a dropper can enhance your ride experience. Also jumping and hitting drops is a lot less sketchy with the saddle in the down position. This makes the rider capable of doing bigger features and being safer in the process.
When & Where To Use a Dropper

When and where you use your dropper post depends on your skills and comfort level as a rider. Some people use them much more frequently than others. Typically, when people first start using one, it’s used for sustained descents only, because that makes sense right off the bat. Over time, as you practice dropping the post frequently during your rides, and notice how getting the saddle out of the way enhances your riding experience and enjoyment, you will use it more often.
Quick corner coming up? Dropper. Rock outcrop that can be easily hopped over? Dropper. Techie switchback series that intimidates you? Dropper. Super techie descents, with jumps, rocks, and corners? Dropper. Bonus: Once you’re ready to climb again, simply hit the lever and the seat is back where you need it to be while you put some power to the pedals.
Cornering: When you’re in a corner, you can utilize side-to-side bike body separation, and lean the bike further in high speed turns. This will allow the saddle to more easily pass between your legs and under your bottom as you proceed downhill in turns
Steep Descents: Dropping the seat in when you’re going down a particularly steep descent, allows your bottom to move freely while maintaining the correct body position and weight distribution to keep your tires on the ground (it’s all about traction, after all!).
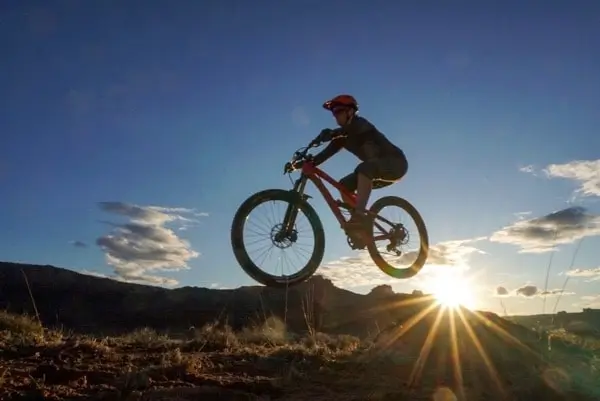
Jumping: When you’re going to be in the air, whether jumping, or dropping, the saddle is lower and out of the way as you take off and land.
Drops: Whether you are doing a small drop, or a large one, it’s best to drop the seat so as not to accidentally ram it into your body upon landing. When your seat hits your rear, it causes your weight to shift too far forward and could result in an unintentional nose wheelie, turned over-the-bar, scenario. It’s best to get your seat out of the way all together and focus on your center of mass (COM) in relation to the bike and the drop.
Rock Gardens: Ever accidentally dive your suspension into a rock and suddenly feel your seat jam you in the tush? Dropping your seat in a rock garden (sometimes only half way) allows you to stand and pedal, easily move the bike underneath you, continue forward momentum without stopping it on your rear and get up and over obstacles with ease.
Ascents: While the primary use for the dropper post is thought to be the descents; it can also be utilized for ascents. You can drop saddle half way while going up obstacles, which also allows front-to-back bike body separation and the ability to move your bike underneath you as you punch it up rocks, roots or climbs where you stand and pedal and immediately roll into a descent.
How To Use A Dropper
How dropper posts function varies from manufacturer to manufacturer. The set up is somewhat personal in relation to the bike type, general set up and style of riding that aligns with the individual rider. Generally, dropper posts are cable actuated, hydraulically actuated, or wirelessly-electronically actuated (via bluetooth technology) by a lever located near the left side hand grip.
A simple thumb-flick while simultaneously applying weight to the saddle, is all it takes to drop your seat FAST. If you only want your seat down partially, sit lightly on the seat while holding the leaver. When you want the seat back up, let go of the lever. Really whenever the saddle is at the height you want, the saddle will stay put at that height. When you feel like pedaling for a while, flick the lever again without any weight on the saddle and it returns to its up position. Magic!
The Takeaway
While not 100% necessary for the bike to function, dropper posts drastically heighten the ease and enjoyment of your rides. The more you practice using them (on any type of terrain), the easier it gets to use them automatically without thinking much about it, and the better each and every ride becomes.


I’ve two bikes with dropper posts, the first was bought about 4 years ago. This is the best article I’ve seen on how best to use them. Great job!
Thanks Ed! So glad you found this helpful and even more excited that you have droppers on your bikes! Ride on!
Need to conserve space in your vehicle? dropper!
I will agree that a dropper will be a big asset to your bike, but I don’t think it’s quite as important as the author thinks it is. I have one on my bike and rarely use it. It’s quite heavy, and the only reason I don’t ditch it and put on a standard post is because it would be a pain to reinstall the internally routed cable if I ever decide to go back to it.
I should add that I am an older rider (so my perspective varies from most) and have had every type of bike with almost any mountain biking innovation since 1990. And I’m so used to shifting my weight around the bike that I don’t even think about it.
For my purposes, there are a few much more important innovations in the sport, such as suspension forks, threadless headsets (my first MTB had a quill stem) and the elimination of front derailleurs. Wider tires, Boost spacing, and disc brakes (I had cantilevers for years) are a few others, at least to me.
I think newer riders probably do like them much more than do I, as it does give an advantage when less experienced. I think there are a few other “old as dirt” riders like myself who might agree.
Every year I continue to try to embrace the dropper, but in the end I just leave it stocked out fully unless I’m descending. You have some good ideas I haven’t tried yet to make this work, so I am looking forward to giving it a shot in the coming riding season. Thanks for the insight.
I 100% mirror Gregory’s take on droppers – as an OF myself that’s been riding mtbs since the early 90’s. As Gregory articulated, there have been many other notable mtb game-changers. My top-3 personal favorites were suspension forks, 29-ers and and 1x cranks (combined with dinner-plate sized cassettes). Dare I mention that I hate front derailleurs? Add rear suspension and plus tires for two more favorites in my book. Droppers are arguably the latest and greatest enhancement to mtb’s. Now if I can just remember to use mine, I’m certain it will add even more enjoyment to the ride.
Can you explain how to figure out what size dropper post to get? Thanks!
Here’s a pretty good link on dropper post selection;
https://www.pnwcomponents.com/blogs/news/5-simple-dropper-measurement-steps
There’s one use of a DP that I don’t believe was mentioned in the article. Whenever I stop on a trail, I lower my saddle all the way so that my feet sit comfortably on the ground while relieving the pressure on my tush.
I was thinking the same thing. I ALWAYS drop my post to stop on the trail. One of the better uses, in my opinion, although I typically honor the others mentioned in the article.
For me personally, the dropper post has been the best upgrade on my Pivot. Yes. You heard that correctly. Prior to getting my ICP certification, I had been riding my Pivot for about 4-years. Didn’t ever think I needed a dropper. Didn’t understand the need for such a gizmo anyway. But what do I know? January of 2022, I attended ICP Certification for 3-days. We spent close to 10-hours on the bike. That’s a lot of saddle time. Anyway, we were sessioning downhill descents when I hear, “HEY! Drop your saddle!!” What?? Drop my saddle? I shouted back, “I don’t have a dropper post!” Everyone, but my riding buddy, seemed to all respond at the same time, “What? You ride a Pivot and you don’t have. a dropper?” Uhh..no. I don’t need it. So I thought.
My buddy let me take his Pivot (one size larger than mine) who has a dropper post on his bike and says, “Here, try it. See if it makes any difference in your descents.”
Oh. My. Gosh!
I then had to try cornering skills again, and side to side, and… you get the message.
Needless to say, while the dropper post may not be for everyone or maybe you just prefer to ride without it because you don’t use it often enough to justify having a dropper, for me, yes. My riding have improved tremendously since I’ve gotten that dang seat out of the way. Also, I coach mountain biking so I definitely want to be able to demonstrate skills in a manner that helps me ride with confidence as well as safe(r).
10-hours on the bike each day for 3-days. A whopping 30-hours! For me, that’s a lot of booty time in the saddle.
For me personally, the dropper post has been the best upgrade on my Pivot. Yes. You heard that correctly. Prior to getting my ICP certification, I had been riding my Pivot for about 4-years. Didn’t ever think I needed a dropper. Didn’t understand the need for such a gizmo anyway. But what do I know? January of 2022, I attended ICP Certification for 3-days. We spent close to 10-hours on the bike each day for 3-days. That’s a lot of saddle time. Anyway, we were sessioning downhill descents when I hear, “HEY! Drop your saddle!!” What?? Drop my saddle? I shouted back, “I don’t have a dropper post!” Everyone, but my riding buddy, seemed to all respond at the same time, “What? You ride a Pivot and you don’t have. a dropper?” Uhh..no. I don’t need it. So I thought.
My buddy let me take his Pivot (one size larger than mine) who has a dropper post on his bike and says, “Here, try it. See if it makes any difference in your descents.”
Oh. My. Gosh!
I then had to try cornering skills again, and side to side, and… you get the message.
Needless to say, while the dropper post may not be for everyone or maybe you just prefer to ride without it because you don’t use it often enough to justify having a dropper, for me, yes. My riding have improved tremendously since I’ve gotten that dang seat out of the way. Also, I coach mountain biking so I definitely want to be able to demonstrate skills in a manner that helps me ride with confidence as well as safe(r).