10% off All Jump Ramps | Use Code: MOBILE10 | Expires Fri 4/19 

Being able to do a front wheel pivot on your bike has a pretty big “cool” factor, but it’s also remarkably useful on the trail. Most often, the front wheel pivot is used to navigate tight switchbacks or turns. But before you can show off your endo 180 skills (aka a front wheel pivot that turns your bike 180°), you gotta start with the basics, practice and progress. 

Our friend Aaron Lutze is a professional trials rider and he is on a mission to get more mountain bikers practicing their trials riding skills in order to improve their trail riding. Aaron is going to walk us through how to dial in all the skills needed for the front wheel pivot, and then how to put it all together into an endo 180. Take it away, Aaron!


Thanks, Ninja! Many people mask the actual technique of endos by jamming on the front brake and holding on for dear life (not recommended).In this article, we are going to brake down the individual components of an endo so you can put it together into a smooth, controlled move. Let’s dive straight in by talking about the importance of body position on the bike and how proper weighting and unweighting can make a huge difference in your success.Next, we’ll going to go through the techniques and nuances that make up a successful back wheel lift. After that, we’ll apply that foundation to some front wheel pivots so you can start turning 180 on the front wheel. Let’s do this! 

1. Body Position: The Unlock For All Technical Riding

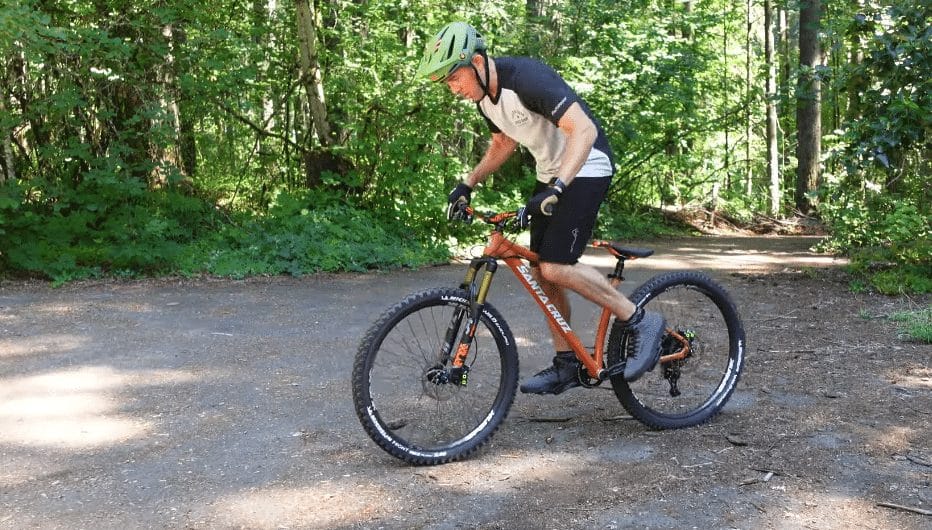
To set the foundation for what we’re learning today, we should talk about your body position on the bike. Since we’re lifting the back wheel up, we want to make sure that our body weight is on the front of the bike. One of the main elements in technical riding (and my specialty, Trials) is where you are weighting and unweighting the bike. Most struggles with technique come from improperly weighting the bike – please be conscious of where you are on the bike before moving into the next few steps. For this entire drill, plan to have your body weight forward, and if you’re struggling, try exaggerating the movement even further forward – that should help unlock it.

2. Back Wheel Lift: The Back Foot Scoop

In the back wheel lift, your back foot does nearly all the work and frankly, the front foot doesn’t do all that much. With your back foot, you want to be thinking about a motion called the pedal scoop

To do the pedal scoop, focus entirely on your back foot. Rotate the pedal forward so that you are pointing the toes of your back foot at the ground and then we’ll do a backward scooping motion with the pedal. In this motion, you’re putting pressure on the pedal and then you’re pushing down, back and then up against the pedal (in that order). One extra thing to note here, you want the back wheel to be unweighted, so make sure your body is ahead of the pedals in this position – that way the back wheel can easily lift off. 

The best part about this technique is that you can get the feel for it without even riding. Stand over your bike, grab your front brake to hold the wheel in place, and test out the pedal movement. You should be able to lift the back wheel off the ground with just that one pedal (with your forward foot on the ground for balance).  

After you’ve gotten the hang of this pedal motion off the bike, you can start doing it with a slow roll. You should be able to do it without using your front brake – nothing major, but the wheel should come off the ground as you roll. If you’re confident here, let’s move on to the next step!

3. The Arms & Shoulders

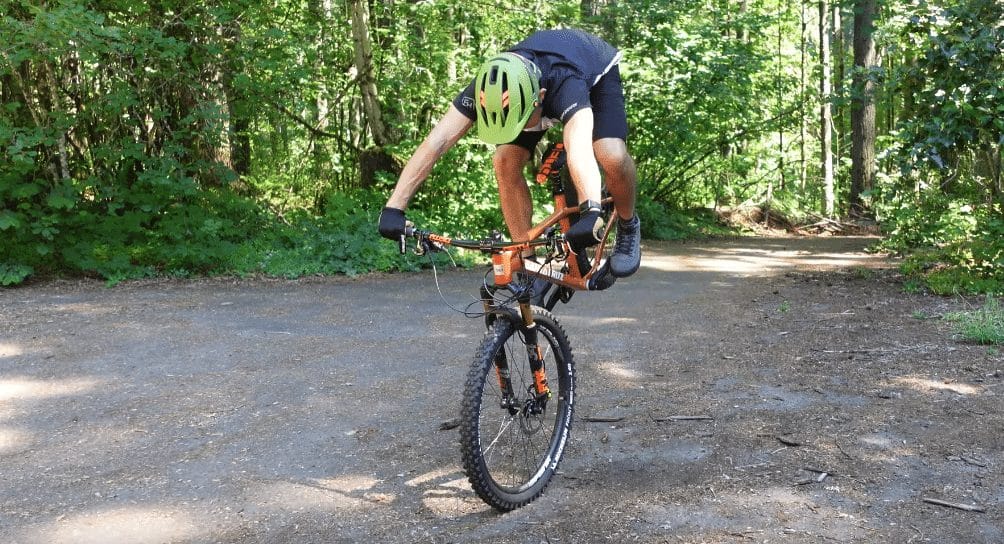
Now that your pedal scoop is in place, let’s come back to the body position on the bike. We talked about unweighting the back wheel and shifting your weight forward. I like to focus on where my shoulders are in relation to the handlebars. The easiest way to get this feeling is to utilize your front brake in combination with that pedal scoop. We’re going to start small and work our way up to the balance point. 

A quick look ahead – there is a reason why we want to learn how to lift the back wheel higher off the ground. As we eventually progress to the pivot, there is a direct connection with how high you can lift the back wheel and how far you can pivot. The higher you get the back wheel, the more time you have before it comes back down to the ground – meaning you are maximizing your time to rotate the bike. 

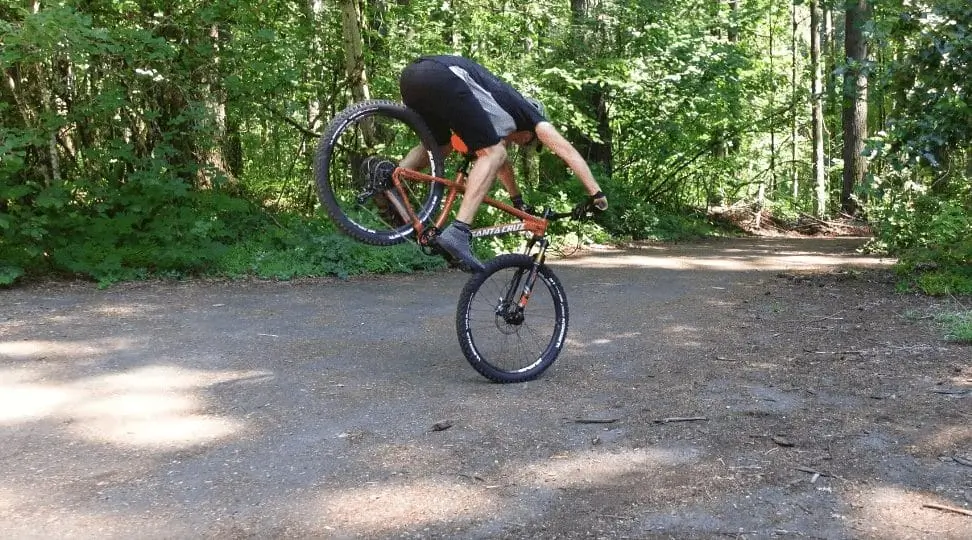
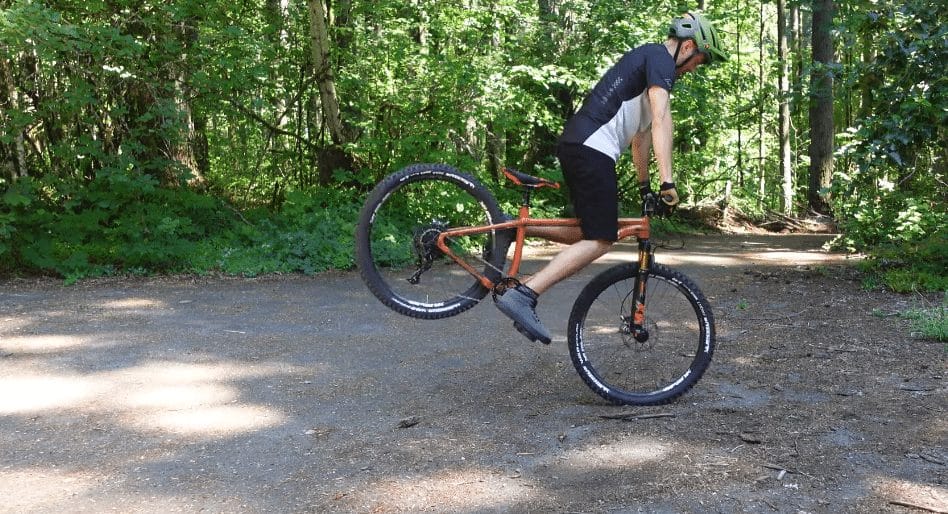
Back to the endo technique – we’re going to combine the scoop with a focus on the shoulders and handlebars. This will get your body position correct and you’ll be up on the front wheel. Focus on keeping your shoulders over your handlebars. Bend your knees and pull them apart to pull the bike up into your body. When I ride, I always like to think of my body like a suspension, and so in this position, I’m pulling the bike up into my body. If I kept it all rigid, I’d need to be a lot farther over the bars to get the rear wheel up this high.

While practicing, you will likely be bringing your bike up even higher than you might do on the trails. The point of this is to get a feel for the full range of motion and as a result, start to understand the balance point on the bike and get more comfortable with it.  The more comfortable you are with this balance point, the easier it is going to be to execute a front wheel pivot out on the trail. 

4. The 180 Endo

Ready to start moving the bike around?   Let’s break the next progression into 2 pieces; The handlebar turn and the back wheel scoop n’ lift. 

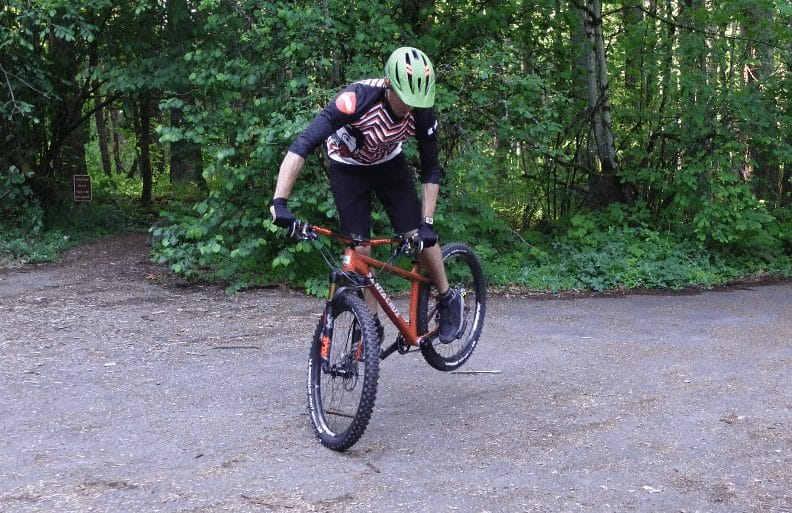
One vital element of the front wheel pivot is finding your own strongest direction to rotate. In addition to the pedal scoop, I’m also using my back foot to gently guide the rear triangle of the bike in the direction I want it to go. In my case, my left foot is my back foot, so I’m pushing against the rear triangle to make the back wheel move to the right. This is one of the major mistakes I see many riders make when they are first learning the move – and even though it’s possible to do it, you’re making it a lot harder than it needs to be. 

Back to the front wheel pivot, the real magic is in the front wheel movement. Pick a spot on the ground where you want to pivot and grab the front brake while you turn the front wheel. You’ll want to turn the bars in the opposite direction you want the back wheel to go.  If your handlebars turn left, your back wheel turns right.  Turning the handlebars first helps you to set the intention of where the bike is going to go. You can also think of this as turning the bike in one direction, i.e. counterclockwise. Start by going counterclockwise with my handlebars and then lift the back wheel (use that back foot scoop) and continue to move the bike in the counterclockwise direction. 

This is where the foundational skill with the endo comes back into play – as you advance, you’ll want to start focusing more on that pedal scoop to bring the rear wheel higher into the air. As I said previously, the higher you can get that rear wheel – the more air time you’ll have to pivot the wheel around. 

5. Progression and Drills 

Start small by locking in the basics, slowly working your way up to the full 180.  As you practice, start with moving the bike incrementally 10° and then work up to 20°, then 45°, and so on. The last thing you want to do is over-rotate and flip over the bars!  Take it one step (degree) at a time. 

For another great drill, practice keeping your front wheel locked in place and then pivoting a full 360 all the way around by just going 10° and then another 10°  and so on until you’ve made a full circle. Make sure you are focused on actually picking up the back wheel and then setting it down with purpose.  You don’t want to be skating or sliding that rear wheel into place.  Learning new skills is all about gradual, incremental progress and building up that muscle memory.  Be patient with yourself (and your bike)! 

6. What to do with your hands?!

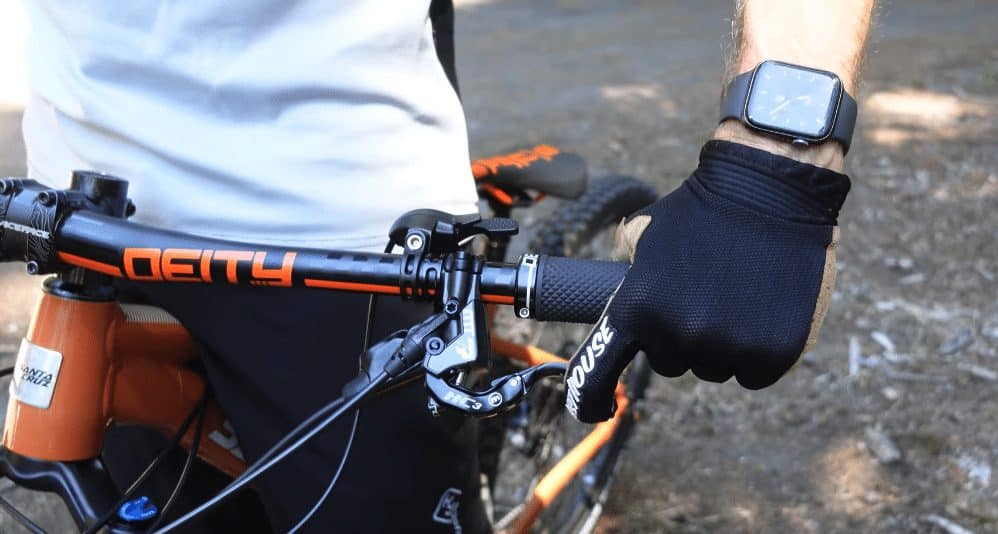
When talking about doing endos, we often forget to talk about what your hands are actually doing while you’re trying to make this pivot happen.  Obviously, your hands are on the handlebars but more importantly, you have four fingers on the bar and one finger on the brakes.  You do this because you want as much control over the bike as possible.   If you were to use two fingers to brake, all of sudden the only thing holding on to your grips is your ring finger and pinky and with only those two fingers, you have significantly less strength and control with that drip.  Stick with one finger braking! 

Have fun with it 

Practice getting up into your endo and pedaling in the air.  I do this because it allows me to stop thinking so hard about my balance point, and well, it looks cool!  You’re just letting your body and your muscle memory take over on the front wheel balance and sometimes that’s what we need. 

Another drill to practice is riding fakie, where you complete the 180 and land your bike completely backward and with the intention to ride in the opposite direction.  As soon as you pull your weight back a little bit and backpedal.  This is called “riding fakie” and the backpedaling is necessary so the hub doesn’t engage. It’s essentially like putting the bike in neutral.  

Don’t be shy.  Add some flair to your endos.  Remember, if you’re not having fun it’s not worth it. 

If this move came easy to you, definitely check out “The Five Best Parking Lot Tricks To Practice” on my YouTube channel, Super Rider. If you’d like to continue learning new techniques to improve your riding, you can find me on YouTube, TikTok and Instagram. I also do a livestream on Twitch twice a week, where we answer questions about riding technique live from the Shred Spot. Have fun! 

5 Responses

  1. I am a newbie and I think you meant to say that the backpedaling is necessary so the hub DOESN’T engage.
    I will be at the Nashville weekend in May. I look forward to learning how to do this under guidance. I am practicing using this info now. Great stuff. Thanks for posting.

    1. You are correct – – that should have read “hub doesn’t engage”. Thanks for pointing that out. We’ve fixed the typo! We look forward to riding with you in May. Happy Trails. 🙂

  2. I’ve found that keeping my eyes on the horizon, as opposed to staring down at my front wheel, makes endos much smoother and more natural. Keeping my head up helps me focus on where my body is instead of worrying about where the bike is.

  3. If your back foot does most of the work, does that mean you should switch lead legs to move the rear wheel one direction vs the other? Usually you just stick to one lead leg and dont switch. Or is it just harder to learn the other direction?

Leave a Reply

Your email address will not be published. Required fields are marked *

keep me in the loop

NOTIFY ME!

I’d like to be notified when new events are added.

Your Privacy is Protected. We will never sell or share your information.

Fundamentals Trail Application - Women's Only

Here’s What We’ll Cover

The specific skills taught in this clinic will depend on available trail features and will vary between locations. Skills covered may include:

  • Rock / Log Step-Ups 
  • Pedal Assisted Front Wheel Lifts
  • Steep Transitions, Roll-Downs
  • Reading trail and line choice
  • Using trail features for maximum flow
  • Turning (Low Speed)
  • Navigating Trail Obstacles
  • Switchbacks – Optimal Line Choice
  • Ratcheting application – how & when 
  • Track stands
  • Braking for Speed 
  • Shifting – Timing + Technique on Technical Terrain
  • Skinnies
  • Off-Camber Trails 
  • Berms 
  • Water crossings 
  • Roots 

The Schedule*

  • 1:15-1:30pm Meet your instructor  | Arrival at course venue + equipment check
  • 1:30 – 1:45pm Fundamentals Skills | Rapid Review 
  • 1:45 – 3:45pm Coached Trail Ride | Sessioning & Skills Application
  • 3:45-4:00pm Review, questions & next steps | #Ridelikeaninja

*Clinic schedule and skills covered may vary according to location and terrain.

Fundamentals Trail Application

Here’s What We’ll Cover

The specific skills taught in this clinic will depend on available trail features and will vary between locations. Skills covered may include:

  • Rock / Log Step-Ups 
  • Pedal Assisted Front Wheel Lifts
  • Steep Transitions, Roll-Downs
  • Reading trail and line choice
  • Using trail features for maximum flow
  • Turning (Low Speed)
  • Navigating Trail Obstacles
  • Switchbacks – Optimal Line Choice
  • Ratcheting application – how & when 
  • Track stands
  • Braking for Speed 
  • Shifting – Timing + Technique on Technical Terrain
  • Skinnies
  • Off-Camber Trails 
  • Berms 
  • Water crossings 
  • Roots 

The Schedule*

  • 1:15-1:30pm Meet your instructor  | Arrival at course venue + equipment check
  • 1:30 – 1:45pm Fundamentals Skills | Rapid Review 
  • 1:45 – 3:45pm Coached Trail Ride | Sessioning & Skills Application
  • 3:45-4:00pm Review, questions & next steps | #Ridelikeaninja

*Clinic schedule and skills covered may vary according to location and terrain.

Ninja Kids clinics

Here’s What We’ll Cover

Some of the skills taught and practiced in the Kids Fundamentals Clinic may include:

  • Ninja (Ready) Position
  • The Riding Rainbow: Body Position
  • How to use your gears
  • Front + Rear Wheel Lifts
  • Safely getting on/off your bike
  • Getting over trail obstacles
  • Turning + Switchbacks
  • Reading the trail: Red Light, Yellow Light, Green Light
  • When and how to brake
  • The 4 Climbing Positions
  • Descending in control
  • How to have fun and be safe!
  • Safety check, bike care

Clinic schedule, time and skills covered may vary according to location and terrain.

2-Day CAMPS

Sample Camp Schedule*

Day 1 (Saturday)

  • 8:45-9:00 Meet your instructor  | Arrival at course venue + equipment check
  • 9:00-9:15 Let’s get started | Introductions, camp overview, bike safety check, bike set-up review
  • 9:15-9:30 Warm-up ride | Head to skills area
  • 9:30-12:15 Mornings skills session | Ready position, bike-body separation, effective braking, fluid shifting, body positioning, wheel lifts
  • 12:15-1:30 Lunch break | BYO
  • 1:30 – 4:00 Intro to jumping | Manuals, bunny hops + how to safely jumping (and land) your mountain bike

Day 2 (Sunday)

  • 8:45-9:00 Meet at trailhead | Gear up for day 2!
  • 9:00-9:15 Review | Brief review of Day 1 skills
  • 9:15-12:00 Morning skills session | High-speed cornering, switchbacks, drops, rock dodge, technical climbing & descending
  • 12:00-1:00  Lunch break | BYO
  • 1:00-3:45 Trail ride + skills application | Put those skills to work!
  • 3:45-4:00 Review, questions & next steps | #Ridelikeaninja


*Clinic schedule and skills covered may vary according to location and terrain.

After camp, you will see an immediate improvement in your riding and a boost in confidence on technical trails. You will be able to tackle rougher terrain and corners with greater control and flow through singletrack, switchbacks, and berms with more speed and efficiency.

Jumping Mini-Clinics

Here’s What We’ll Cover

Some of the skills taught and practiced in the Jumping Mini-Clinic may include:

  • Wheel lift Review
  • Bunny hops
  • Jumping body positioning
  • Anatomy of a jump
  • Speed vs. compression | How and when?
  • Landing with precision
  • Let’s get jumping! | Jump progressions

The Schedule*

Please note, clinics may vary according to location and terrain.

  • 1:30-1:45  Meet your instructor | Arrival at course venue + equipment check
  • 1:45-2:00 Let’s get started | Introductions
  • 2:00 – 2:30  Intro to jumping | Wheel lifts, manual, bunny hop
  • 2:30 – 3:00 Reading the jump | Anatomy of a jump, speed vs compression, landings
  • 3:00 – 3:45 Let’s jump! | Jumping progressions on table tops
  • 3:45-4:00 Review and next steps | #ridelikeaninja


*Clinic schedule and skills covered may vary according to location and terrain.

Intermediate / advanced clincs

Here’s What We’ll Cover

Some of the skills taught and practiced in the Intermediate/Advanced clinic may include:

  • Negotiating trail obstacles (i.e. rock gardens, roots, logs)
  • Steep transitions
  • Drops
  • High speed cornering
  • Technical climbing
  • Technical descending
  • Advanced braking
  • Reading the trail
  • Introduction to energy management & flow
  • Pumping for speed & air
  • Technical Switchbacks (where available)
  • Ratcheting & Trackstands
  • Visualization

The Schedule*

  • 8:45-9:00 Meet your instructor  | Arrival at course venue + equipment check
  • 9:00-9:15 Let’s get started | Introductions
  • 9:15-9:45 Accelerated review of Fundamentals | With intermediate+advanced progressions
  • 9:45-12:00 Morning skills session | High-speed cornering, Switchbacks, drops, rock dodge, technical climbing & descending
  • 12:00-1:00  Lunch break | BYO
  • 1:00-3:45 Trail ride + skills application | Put those skills to work!
  • 3:45-4:00 Review, questions & next steps | #Ridelikeaninja

*Clinic schedule and skills covered may vary according to location and terrain.

WOMEN'S ONLY Fundamentals Combo

Here’s What We’ll Cover

The specific skills taught in this clinic will depend on available trail features and will vary between locations. Skills covered may include:

  • The Ready Position
  • Bike/Body Separation
  • Intro to Steep Transitions
  • Effective Braking
  • Braking for speed
  • Wheels lifts – Step-Ups
  • Shifting, Timing & Cadence
  • Negotiating trail obstacles
  • Turning / Switchbacks
  • Climbing + Descending
  • Dismounting
  • Mind skills
  • Steep Transitions, Roll-Downs
  • Reading trail and line choice
  • Using trail features for flow
  • Turning (Low Speed)
  • Ratcheting – how & when 
  • Track stands
  • Skinnies
  • Off-Camber Trails
  • Berms
  • Water crossings
  • Roots

The Schedule*

  • 8:45-9:00  Meet your instructor  | Arrival at course venue + equipment check
  • 9:00-9:15 Let’s get started | Introductions
  • 9:15am – 11:15 Skills & drills | Learn, learn, learn
  • 11:15am – 12:15 Take it to the trail | Apply what you’ve learned
  • 12:15 – 1:30pm Lunch Break | Rest & Refuel
  • 1:30 – 1:45pm Fundamentals Skills | Rapid Review 
  • 1:45 – 3:45pm Coached Trail Ride | Sessioning & Skills Application
  • 3:45-4:00pm Review, questions & next steps | #Ridelikeaninja

*Clinic schedule and skills covered may vary according to location and terrain.

Co-ed Fundamentals Combo

Here’s What We’ll Cover

The specific skills taught in this clinic will depend on available trail features and will vary between locations. Skills covered may include:

  • The Ready Position
  • Bike/Body Separation
  • Intro to Steep Transitions
  • Effective Braking
  • Braking for speed
  • Wheels lifts – Step-Ups
  • Shifting, Timing & Cadence
  • Negotiating trail obstacles
  • Turning / Switchbacks
  • Climbing + Descending
  • Dismounting
  • Mind skills
  • Steep Transitions, Roll-Downs
  • Reading trail and line choice
  • Using trail features for flow
  • Turning (Low Speed)
  • Ratcheting – how & when 
  • Track stands
  • Skinnies
  • Off-Camber Trails
  • Berms
  • Water crossings
  • Roots

The Schedule*

  • 8:45-9:00  Meet your instructor  | Arrival at course venue + equipment check
  • 9:00-9:15 Let’s get started | Introductions
  • 9:15am – 11:15 Skills & drills | Learn, learn, learn
  • 11:15am – 12:15 Take it to the trail | Apply what you’ve learned
  • 12:15 – 1:30pm Lunch Break | Rest & Refuel
  • 1:30 – 1:45pm Fundamentals Skills | Rapid Review 
  • 1:45 – 3:45pm Coached Trail Ride | Sessioning & Skills Application
  • 3:45-4:00pm Review, questions & next steps | #Ridelikeaninja

*Clinic schedule and skills covered may vary according to location and terrain.

Women's Only Fundamentals Clinics

Level 1 - Here’s What We’ll Cover

Some of the skills taught and practiced in the Women’s Only Fundamentals Clinic may include:

  • The Ready Position
  • Bike/Body separation
  • Intro to Steep Transitions
  • Effective braking
  • Wheels lifts
  • Shifting + cadence
  • Negotiating trail obstacles
  • Turning / Switchbacks
  • Climbing + Descending
  • Dismounting
  • Mind skills

The Schedule*

  • 8:45-9:00  Meet your instructor  | Arrival at course venue + equipment check
  • 9:00-9:15 Let’s get started | Introductions
  • 9:15am – 11:15 Skills & drills | Learn, learn, learn
  • 11:15am – 12:00 Take it to the trail | Apply what you’ve learned
  • 12:00-12:15 Review and next steps | #ridelikeaninja
 

*Clinic schedule and skills covered may vary according to location and terrain.

Co-ed Fundamentals Clinics

Level 1 - Here’s What We’ll Cover

Some of the skills taught and practiced in the Fundamentals Clinic may include:

  • The Ready Position
  • Bike/Body separation
  • Intro to Steep Transitions
  • Effective braking
  • Wheels lifts
  • Shifting + cadence
  • Negotiating trail obstacles
  • Turning / Switchbacks
  • Climbing + Descending
  • Dismounting
  • Mind skills

The Schedule*

  • 8:45-9:00  Meet your instructor  | Arrival at course venue + equipment check
  • 9:00-9:15 Let’s get started | Introductions
  • 9:15am – 11:15 Skills & drills | Learn, learn, learn
  • 11:15am – 12:00 Take it to the trail | Apply what you’ve learned
  • 12:00-12:15 Review and next steps | #ridelikeaninja
 

*Clinic schedule and skills covered may vary according to location and terrain.

LEAVING SO SOON?

60% Off

IF YOU SIGN UP FOR A MTB SKILLS CLINIC TODAY!

Enter your email below to get your limited time coupon code (valid for 48 hours).

Valid on all Skills Camps and Clinics. Your Privacy is Protected.

Awesome sauce!

60% Off

USE THIS CODE TO SIGN UP TODAY!

CHECKOUT4XY2

*Limited time offer. Valid for 48 hours on any upcoming MTB skills clinic or camp.