10% off All Jump Ramps | Use Code: MOBILE10 | Expires Fri 4/19 

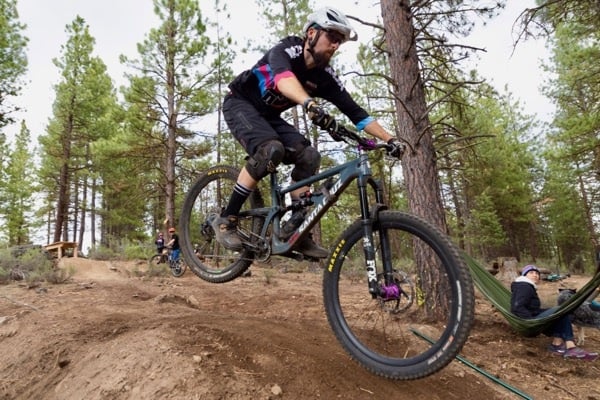
Why does jumping look so easy on youtube and feel oh-so-hard in person?! Jumping takes nearly every mountain biking skill and puts them all together into one beautiful harmony and with so many moving pieces, it’s easy to miss a note. Let’s do some troubleshooting and figure out why your jumping might be a little off key.

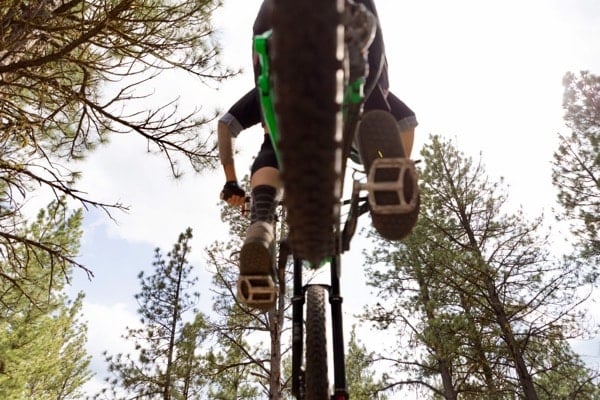
1. Feet coming off the pedals

Most often we see feet coming off the pedals when a riders body is coming up faster than their bike, or the body is too stiff and ends up pushing the bike away from the body. 

The Fix

When jumping, you have to allow the bike to travel upwards towards your body by bending your arms and legs and drawing the bike up towards you.

Also consider your equipment.  Good shoes and pedals are vital for maintaining contact with your bike. Purpose built bike shoes work far better than any kind of tennis or skate shoe and mountain bike-specific flat pedals (not the $10 plastic platform pedals) are a MUST for jumping.  If that doesn’t seem to be the issue, get familiar with your suspension and consider making some adjustments (checkout Suspension Setup in 4 Easy Steps).

2. Front wheel turning in the air

Intentionally turning a front wheel in the air for a little added flare is admittedly pretty cool.  Unintentionally turning your front wheel in the air is bad! Landing with a twisted wheel can end in disaster.

The Fix

When jumping, you should be guiding the bars up but not tugging.  A turning front wheel happens what you are tugging on the bars and pulling more on one side than the other.  Focus on guiding the bike and handlebars up, but not tugging.

3. Landing feels rough

What type of landing are you on – descending or flat?  If you are working on a descending landing, you should be landing front wheel first.  If you are instead landing rear wheel first, the front of the bike is likely to pivot forward and slam to the ground, thus trusting your weight abruptly forward and potentially over the front of the bike.

If your landing is flat, land with your rear wheel first.  Landing on flat surfaces is more abrupt and landing rear wheel first allows you to use your legs to absorb the majority of the landing force.

The Fix

No matter what type of landing you are working on, remember to use the “free” compression in your legs.  Don’t be stiff!  

Practice what it feels like to land “light as a feather”.  Stand on flat ground (without your bike) and pretend someone is dangling a $100 bill over your head.  Now jump up and reach for the bill – note the sound your feet make when you come back down to the ground.  Now do the same thing again but this time, specifically focus on trying to make zero noise when you land. Notice the difference?  On the second jump, you used your legs as suspension and gracefully soaked up the impact. You want to do this exact same thing when landing a jump.

4. Not clearing the table

Don’t go blaming your speed or suspension just yet. Start by taking a good hard look at your compression.

The biggest mistakes we see riders make when trying to jump is the lack of compression on the take-off (face) of the jump.  If you don’t compress, your bike will behave very similarly to a rock. Gravity will get the best of you (and your bike) and you will promptly get pulled back down to earth a la Newton’s apple.  Compression is merely the action of stomping your feet quickly and then allowing the bike to come up under you. So stomp down on those pedals like you mean it. Get aggressive. Grrrr!

The Fix

Start your troubleshooting by focusing specifically on adding a bigger compression and using that momentum, to help you clear that table.  Once you’ve got that figured out, you can play around with adding a little speed (and adjust the necessary compression accordingly). It’s a fine balancing act! 

5. Overshooting the landing

Chances are, you’re letting the bike determine where it wants to go instead of you telling the bike where you want it to go.  You’re the boss!

The Fix

Where you land is up to you — jumping and hoping you land in the right spot is a risky proposition.  When you’re in the air, LOOK down and spot your landing. Assuming you are on a descending landing, tell that front wheel where you want it to go by extending your arms and PUSHING your front wheel down towards your desired landing spot.

To practice, set a leaf (or something highly visible) on the jump landing where you want your front wheel to land.  Ride the jump, look for that leaf, and PUSH the front of your bike down aiming to hit the leaf with your front wheel.  Move the leaf around to a few different landing spots to practice hitting your target.

If this doesn’t solve the issue then slow down your speed a bit, you speed demon you! 

Now that you have the tools to troubleshoot the most common jumping mistakes, you can take the next step toward conducting a beautiful symphony in the air.

If you’d like to learn more, practice jumping in a safe, controlled environment and get real-time feedback, join us for a Jumping Fundamentals Mini-clinic!

12 Responses

  1. Hi,
    How nice article this is! I am a bike lover. Your valuable tips and suggestions is very wrathful for me to bring my biking skills one step ahead. Keep posting new tips with us..

  2. These are great ideas. Thank you!
    I think you need to stress that the things you teach have to be PRACTICED. Some people just want a quick fix and don’t realize that what you are teaching are SKILLS, and like all other skills you have to practice to get much better. I have started going to a local bike park to focus on my jumping. Then when i get back on the trails I concentrate on the obstacle and know my skills will be ready when needed.

    1. Great point – YES to practice, practice, practice! There are very few “quick fixes” in mountain biking. If you want to see results, you have to commit to putting in the work! You also can’t learn everything at once, so focusing on one or two skills at a time is a great way to ride.

  3. here a great article about mountain bile, the last 5 years i used the mountain bike GT Karakoram. like this flying me. thank you.

  4. I love this post. It is very informative, but I have a question about one of the steps and that is how to fix the “hole in your jeans”. What do you mean by this? How can we repair our jeans so they don’t leak if there’s a hole?

  5. This is such a nice article! I love riding a bike. My biking skills have advanced one step because of your useful tips and suggestions. Thanks for sharing!

  6. It’s a great article. I’m a bike lover. Thanks to your valuable tips and suggestions, I am bringing my biking skills one step further. Thanks for sharing your tips with us.

  7. It’s a great article. I’m a bike lover. Thanks to your valuable tips and suggestions, I am bringing my biking skills one step further. Thanks for sharing your tips with us.

  8. Jumping on an MTB does not require special equipment but it is recommended to have your safety gear, particularly your helmet. You’ll also find a pair of bike gloves handy as you practice jumping raps.

  9. beautiful post I must say. Jumping is an essential skill in many sports, including equestrian, motocross, and mountain biking. However, even experienced athletes can make mistakes that can lead to poor performance, injury, or accidents.

  10. According to my experience, Common jumping mistakes include leaning too far forward or backward, and not using proper arm swing. To fix them, maintain an upright posture and coordinate arm movements with the jump to generate momentum.

Leave a Reply

Your email address will not be published. Required fields are marked *

keep me in the loop

NOTIFY ME!

I’d like to be notified when new events are added.

Your Privacy is Protected. We will never sell or share your information.

Fundamentals Trail Application - Women's Only

Here’s What We’ll Cover

The specific skills taught in this clinic will depend on available trail features and will vary between locations. Skills covered may include:

  • Rock / Log Step-Ups 
  • Pedal Assisted Front Wheel Lifts
  • Steep Transitions, Roll-Downs
  • Reading trail and line choice
  • Using trail features for maximum flow
  • Turning (Low Speed)
  • Navigating Trail Obstacles
  • Switchbacks – Optimal Line Choice
  • Ratcheting application – how & when 
  • Track stands
  • Braking for Speed 
  • Shifting – Timing + Technique on Technical Terrain
  • Skinnies
  • Off-Camber Trails 
  • Berms 
  • Water crossings 
  • Roots 

The Schedule*

  • 1:15-1:30pm Meet your instructor  | Arrival at course venue + equipment check
  • 1:30 – 1:45pm Fundamentals Skills | Rapid Review 
  • 1:45 – 3:45pm Coached Trail Ride | Sessioning & Skills Application
  • 3:45-4:00pm Review, questions & next steps | #Ridelikeaninja

*Clinic schedule and skills covered may vary according to location and terrain.

Fundamentals Trail Application

Here’s What We’ll Cover

The specific skills taught in this clinic will depend on available trail features and will vary between locations. Skills covered may include:

  • Rock / Log Step-Ups 
  • Pedal Assisted Front Wheel Lifts
  • Steep Transitions, Roll-Downs
  • Reading trail and line choice
  • Using trail features for maximum flow
  • Turning (Low Speed)
  • Navigating Trail Obstacles
  • Switchbacks – Optimal Line Choice
  • Ratcheting application – how & when 
  • Track stands
  • Braking for Speed 
  • Shifting – Timing + Technique on Technical Terrain
  • Skinnies
  • Off-Camber Trails 
  • Berms 
  • Water crossings 
  • Roots 

The Schedule*

  • 1:15-1:30pm Meet your instructor  | Arrival at course venue + equipment check
  • 1:30 – 1:45pm Fundamentals Skills | Rapid Review 
  • 1:45 – 3:45pm Coached Trail Ride | Sessioning & Skills Application
  • 3:45-4:00pm Review, questions & next steps | #Ridelikeaninja

*Clinic schedule and skills covered may vary according to location and terrain.

Ninja Kids clinics

Here’s What We’ll Cover

Some of the skills taught and practiced in the Kids Fundamentals Clinic may include:

  • Ninja (Ready) Position
  • The Riding Rainbow: Body Position
  • How to use your gears
  • Front + Rear Wheel Lifts
  • Safely getting on/off your bike
  • Getting over trail obstacles
  • Turning + Switchbacks
  • Reading the trail: Red Light, Yellow Light, Green Light
  • When and how to brake
  • The 4 Climbing Positions
  • Descending in control
  • How to have fun and be safe!
  • Safety check, bike care

Clinic schedule, time and skills covered may vary according to location and terrain.

2-Day CAMPS

Sample Camp Schedule*

Day 1 (Saturday)

  • 8:45-9:00 Meet your instructor  | Arrival at course venue + equipment check
  • 9:00-9:15 Let’s get started | Introductions, camp overview, bike safety check, bike set-up review
  • 9:15-9:30 Warm-up ride | Head to skills area
  • 9:30-12:15 Mornings skills session | Ready position, bike-body separation, effective braking, fluid shifting, body positioning, wheel lifts
  • 12:15-1:30 Lunch break | BYO
  • 1:30 – 4:00 Intro to jumping | Manuals, bunny hops + how to safely jumping (and land) your mountain bike

Day 2 (Sunday)

  • 8:45-9:00 Meet at trailhead | Gear up for day 2!
  • 9:00-9:15 Review | Brief review of Day 1 skills
  • 9:15-12:00 Morning skills session | High-speed cornering, switchbacks, drops, rock dodge, technical climbing & descending
  • 12:00-1:00  Lunch break | BYO
  • 1:00-3:45 Trail ride + skills application | Put those skills to work!
  • 3:45-4:00 Review, questions & next steps | #Ridelikeaninja


*Clinic schedule and skills covered may vary according to location and terrain.

After camp, you will see an immediate improvement in your riding and a boost in confidence on technical trails. You will be able to tackle rougher terrain and corners with greater control and flow through singletrack, switchbacks, and berms with more speed and efficiency.

Jumping Mini-Clinics

Here’s What We’ll Cover

Some of the skills taught and practiced in the Jumping Mini-Clinic may include:

  • Wheel lift Review
  • Bunny hops
  • Jumping body positioning
  • Anatomy of a jump
  • Speed vs. compression | How and when?
  • Landing with precision
  • Let’s get jumping! | Jump progressions

The Schedule*

Please note, clinics may vary according to location and terrain.

  • 1:30-1:45  Meet your instructor | Arrival at course venue + equipment check
  • 1:45-2:00 Let’s get started | Introductions
  • 2:00 – 2:30  Intro to jumping | Wheel lifts, manual, bunny hop
  • 2:30 – 3:00 Reading the jump | Anatomy of a jump, speed vs compression, landings
  • 3:00 – 3:45 Let’s jump! | Jumping progressions on table tops
  • 3:45-4:00 Review and next steps | #ridelikeaninja


*Clinic schedule and skills covered may vary according to location and terrain.

Intermediate / advanced clincs

Here’s What We’ll Cover

Some of the skills taught and practiced in the Intermediate/Advanced clinic may include:

  • Negotiating trail obstacles (i.e. rock gardens, roots, logs)
  • Steep transitions
  • Drops
  • High speed cornering
  • Technical climbing
  • Technical descending
  • Advanced braking
  • Reading the trail
  • Introduction to energy management & flow
  • Pumping for speed & air
  • Technical Switchbacks (where available)
  • Ratcheting & Trackstands
  • Visualization

The Schedule*

  • 8:45-9:00 Meet your instructor  | Arrival at course venue + equipment check
  • 9:00-9:15 Let’s get started | Introductions
  • 9:15-9:45 Accelerated review of Fundamentals | With intermediate+advanced progressions
  • 9:45-12:00 Morning skills session | High-speed cornering, Switchbacks, drops, rock dodge, technical climbing & descending
  • 12:00-1:00  Lunch break | BYO
  • 1:00-3:45 Trail ride + skills application | Put those skills to work!
  • 3:45-4:00 Review, questions & next steps | #Ridelikeaninja

*Clinic schedule and skills covered may vary according to location and terrain.

WOMEN'S ONLY Fundamentals Combo

Here’s What We’ll Cover

The specific skills taught in this clinic will depend on available trail features and will vary between locations. Skills covered may include:

  • The Ready Position
  • Bike/Body Separation
  • Intro to Steep Transitions
  • Effective Braking
  • Braking for speed
  • Wheels lifts – Step-Ups
  • Shifting, Timing & Cadence
  • Negotiating trail obstacles
  • Turning / Switchbacks
  • Climbing + Descending
  • Dismounting
  • Mind skills
  • Steep Transitions, Roll-Downs
  • Reading trail and line choice
  • Using trail features for flow
  • Turning (Low Speed)
  • Ratcheting – how & when 
  • Track stands
  • Skinnies
  • Off-Camber Trails
  • Berms
  • Water crossings
  • Roots

The Schedule*

  • 8:45-9:00  Meet your instructor  | Arrival at course venue + equipment check
  • 9:00-9:15 Let’s get started | Introductions
  • 9:15am – 11:15 Skills & drills | Learn, learn, learn
  • 11:15am – 12:15 Take it to the trail | Apply what you’ve learned
  • 12:15 – 1:30pm Lunch Break | Rest & Refuel
  • 1:30 – 1:45pm Fundamentals Skills | Rapid Review 
  • 1:45 – 3:45pm Coached Trail Ride | Sessioning & Skills Application
  • 3:45-4:00pm Review, questions & next steps | #Ridelikeaninja

*Clinic schedule and skills covered may vary according to location and terrain.

Co-ed Fundamentals Combo

Here’s What We’ll Cover

The specific skills taught in this clinic will depend on available trail features and will vary between locations. Skills covered may include:

  • The Ready Position
  • Bike/Body Separation
  • Intro to Steep Transitions
  • Effective Braking
  • Braking for speed
  • Wheels lifts – Step-Ups
  • Shifting, Timing & Cadence
  • Negotiating trail obstacles
  • Turning / Switchbacks
  • Climbing + Descending
  • Dismounting
  • Mind skills
  • Steep Transitions, Roll-Downs
  • Reading trail and line choice
  • Using trail features for flow
  • Turning (Low Speed)
  • Ratcheting – how & when 
  • Track stands
  • Skinnies
  • Off-Camber Trails
  • Berms
  • Water crossings
  • Roots

The Schedule*

  • 8:45-9:00  Meet your instructor  | Arrival at course venue + equipment check
  • 9:00-9:15 Let’s get started | Introductions
  • 9:15am – 11:15 Skills & drills | Learn, learn, learn
  • 11:15am – 12:15 Take it to the trail | Apply what you’ve learned
  • 12:15 – 1:30pm Lunch Break | Rest & Refuel
  • 1:30 – 1:45pm Fundamentals Skills | Rapid Review 
  • 1:45 – 3:45pm Coached Trail Ride | Sessioning & Skills Application
  • 3:45-4:00pm Review, questions & next steps | #Ridelikeaninja

*Clinic schedule and skills covered may vary according to location and terrain.

Women's Only Fundamentals Clinics

Level 1 - Here’s What We’ll Cover

Some of the skills taught and practiced in the Women’s Only Fundamentals Clinic may include:

  • The Ready Position
  • Bike/Body separation
  • Intro to Steep Transitions
  • Effective braking
  • Wheels lifts
  • Shifting + cadence
  • Negotiating trail obstacles
  • Turning / Switchbacks
  • Climbing + Descending
  • Dismounting
  • Mind skills

The Schedule*

  • 8:45-9:00  Meet your instructor  | Arrival at course venue + equipment check
  • 9:00-9:15 Let’s get started | Introductions
  • 9:15am – 11:15 Skills & drills | Learn, learn, learn
  • 11:15am – 12:00 Take it to the trail | Apply what you’ve learned
  • 12:00-12:15 Review and next steps | #ridelikeaninja
 

*Clinic schedule and skills covered may vary according to location and terrain.

Co-ed Fundamentals Clinics

Level 1 - Here’s What We’ll Cover

Some of the skills taught and practiced in the Fundamentals Clinic may include:

  • The Ready Position
  • Bike/Body separation
  • Intro to Steep Transitions
  • Effective braking
  • Wheels lifts
  • Shifting + cadence
  • Negotiating trail obstacles
  • Turning / Switchbacks
  • Climbing + Descending
  • Dismounting
  • Mind skills

The Schedule*

  • 8:45-9:00  Meet your instructor  | Arrival at course venue + equipment check
  • 9:00-9:15 Let’s get started | Introductions
  • 9:15am – 11:15 Skills & drills | Learn, learn, learn
  • 11:15am – 12:00 Take it to the trail | Apply what you’ve learned
  • 12:00-12:15 Review and next steps | #ridelikeaninja
 

*Clinic schedule and skills covered may vary according to location and terrain.

LEAVING SO SOON?

60% Off

IF YOU SIGN UP FOR A MTB SKILLS CLINIC TODAY!

Enter your email below to get your limited time coupon code (valid for 48 hours).

Valid on all Skills Camps and Clinics. Your Privacy is Protected.

Awesome sauce!

60% Off

USE THIS CODE TO SIGN UP TODAY!

CHECKOUT4XY2

*Limited time offer. Valid for 48 hours on any upcoming MTB skills clinic or camp.